
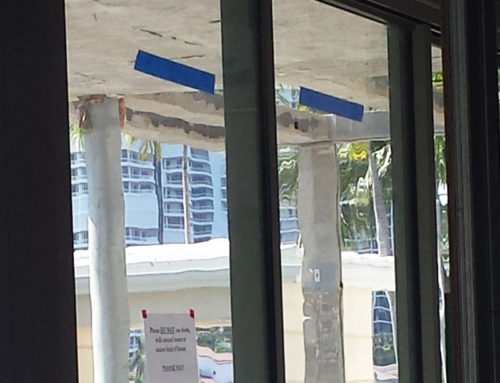
“I don’t want my windows to leak.” We hear this all the time from both homeowners and contractors. If everyone is so concerned about it, why is it that window and door installations still leak? While many may look to the windows and doors themselves, the truth is that leaks are usually caused by the improper installation of materials.Proper and essential waterproofing of window and door installations is outlined as a requirement in the Florida Building Code**. Even with these guidelines in place the process remains misunderstood and is rarely implemented properly. At Sunex International, Inc. we will not install products without following proper waterproofing procedures. Unfortunately this isn’t the case for all projects.To further prevent improper window and door installations changes were made to the Florida Building Code in 2012. The major changes in the code relative to the waterproofing of masonry window and door installations addressed the opening around the window, the caulking of the bucks to the masonry, and the caulking of the windows to the bucks. The new procedures outline treating the masonry opening with a water resistant coating to seal the porous concrete against moisture intrusion around the window and the buck. This also creates a waterproof surface for the caulk to adhere to.Using these codes as a guide, here’s how it should be done …Step One: Fastening the BucksWood bucks are used to create a framed opening within the masonry. Wood bucks serve a couple of purposes. First, they allow flanged windows to overlap the buck and create a better seal. Secondly, they help to compensate for inconsistent masonry openings to create a plumb, square, and true framed opening for proper window installation. In order to properly waterproof windows, the bucks should be fastened with caulk both behind and in front of them (Image 1 & 2). This can be done through a 1x buck as a “shim” or a 2x buck with Tapcons. A 2x buck is generally used for wood windows.This is a big change from older methods which had the bucks attached by cut nails.
 Image 1
 Image 2
Step Two: Sealing the BucksAnother layer of waterproofing is then applied over the exterior face of the buck, the inside face of the sill, and 6” up the sides. This is the absolute minimum, though we would recommend waterproofing the entire perimeter. This creates a continuous seal over the buck to the waterproofing layer on the masonry, completely encapsulating the bucks against exterior moisture intrusion (Image 3).
 Image 3
Step Three: Installation and Caulking of Windows Once the waterproofing of the opening is complete the window can then be installed plumb, level, and true with generous caulking behind the window flange, if applicable (Image 4). In instances where there is not a flange, such as doors and storefronts, then use a closed cell foam backer rod between the frame and the buck with generous caulking to close the gap (Image 5). Flangeless windows and doors require more attention to ensure proper waterproofing.
 Image 4
 Image 5
Step Four: Additional Sealant After the windows have been installed an additional layer of sealant is applied over the flange to create a double seal (Image 6).
 Image 6
Step Five: Addressing Door Sills (when applicable) Door sills are another area that require special attention, especially because most manufacturers do not provide integrated sill pans to prevent water intrusion. With stone flooring water leaks would probably go unnoticed, but that changes when there is hardwood flooring or a second floor balcony involved. In these cases it is critical that water intrusion be prevented. Sliding glass doors are especially vulnerable due to the large number of fastener penetrations at the sill. There are many ways to fabricate sill pans with aluminum and membrane barriers but they should be planned for (Image 7)
 Image 7
Windows and doors are a major investment to begin with and with this level of waterproofing, they can get even more expensive. That said, it’s worth it! Take our advice and spend the extra cash upfront to do the job properly. It will cost you far more in the long run if you end up having to install replacements.**Waterproofing is referenced in the Florida Building Code associated by AAMA (American Architectural Manufacturers Association) in collaboration with the FMA (Fenestration Manufacturers Association) as published in “Surface Barrier Masonry Construction for Extreme Wind/Water Conditions 200-09” which was incorporated into the Florida Building Code in 2012.